Online Class Listing Tables display information about your class offerings online, organized in a user-friendly table format (columns and rows). The listing tables:
- Update automatically in REAL-TIME, so families always see current class information.
- Showcase your classes and increase enrollment; they are highly customizable.
- Transform responsively (mobile-friendly) on mobile devices if your website is optimized for mobile viewing.
 |
We recommend downloading, printing, and reviewing the Online Class Listing Tables Checklist for a Successful Rollout. |
Getting Started - Review Your Settings
Before starting with your Online Class Listing Tables, make sure your Online Registration Form has been set up, your Class Settings are ready to go, and you have defined your Online Class Listing Tables Settings as listed below.
| Online Registration Form |
If you allow online enrollment, your customers can access the Online Registration Form from a registration link in your Online Class Listing Tables. Customizing the form before taking your classes online is recommended. The settings used to customize the form are located under the Gear (icon) > Settings > Online Registration. They include defining what information will display about your classes, whether or not you will allow waitlists, and more. See Customize Your Online Registration Form for details. |
| Class Settings |
The Summary tab of each Class record contains several settings you should consider before listing your classes online:
|
| Online Class Listing Tables Settings |
There are two settings specific to the Online Class Listing Tables to review. They are located in the Class Listings Tables on your Website section of the Online Registration settings (Gear icon >Settings > Online Registration).
|
The Basic Online Class Listing Table
The basic Online Class Listing Table includes twelve columns of class information displayed in this order: Register, Class, Description, Days, Times, Gender, Ages, Openings, Class Starts, Class Ends, Session, and Tuition.
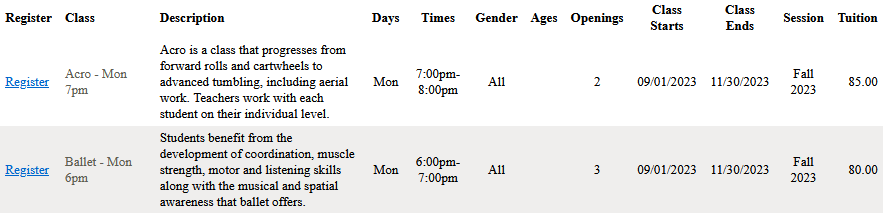
This column order cannot be changed. Note: If you have gender hidden in Jackrabbit, the Gender column will be automatically omitted from the table.
There are two methods of sharing your Online Class Listing Tables online:
|
JavaScript Method (Code) |
JavaScript code embeds the Online Class Listing Tables directly on your web page. The website builder you use must support JavaScript; most of them do (e.g., GoDaddy, Squarespace, WordPress). |
|
Direct Method (URL) |
If your website builder doesn't play nicely with JavaScript, for example, Wix, use the Direct Method summarized here:
|
JavaScript Code and Direct URL for the Basic Online Class Listing Table
Select the JavaScript code or Direct URL for the method you'll use to add Online Class Listing Tables to your website. You can also use the Direct URL to share your listing tables in an email blast, a post on social media, etc.
Replace the XXXXX with your Organization ID. Your Organization ID can be found under the Gear icon > Settings > Online Registration.
JavaScript Code:
| <script type="text/javascript" src="https://app.jackrabbitclass.com/jr3.0/Openings/OpeningsJS?OrgID=XXXXXX"></script> |
Direct URL:
| https://app.jackrabbitclass.com/jr3.0/Openings/OpeningsDirect?OrgID=XXXXXX |
Visit Website Editor Instructions to watch short (<2 min) video tutorials demonstrating how to add Online Class Listing Tables in some of the most popular website builders.
Understanding How to Customize Your Online Class Listing Tables
Online Class Listing Tables are highly customizable. You can hide columns of information or show columns that aren't included in the basic table, create separate listings tables using filters, sort the listings in a particular order, add a background color... You get the idea!
Things in this section can start to seem very techie 🤓, so let's use an analogy we can all relate to...cake 🍰!
Think of the JavaScript code or Direct URL for the basic Online Class Listing Table as the recipe for a basic cake. In the same way that you can change the taste and texture of a cake by adjusting the ingredients in the recipe, you can customize how a listing table displays online using parameters (directions and ingredients) that are added to the basic listing table code/URL (recipe).
Each parameter consists of a variable (directions like add or omit) and a value (the name of the ingredient) separated by the '=' symbol. Multiple parameters can be included when separated by the ‘&’ symbol. Think of the '&' as the spoon used to stir your cake batter 🧑🍳.
The basic Online Class Listing Table code and URL already contain one parameter. It tells Jackrabbit which listing tables belong to your Organization. It uses your Organization ID (represented here by XXXXXX) and has been added to the end of the URL after the '?' symbol. In a bakery full of cakes🎂, this parameter identifies which cakes are yours.
JavaScript code:
<script type="text/javascript" src="https://app.jackrabbitclass.com/jr3.0/Openings/OpeningsJS?OrgID=XXXXXX"></script>
Direct URL:
https://app.jackrabbitclass.com/jr3.0/Openings/OpeningsDirect?OrgID=XXXXXX
Let's look at an example:
Here is a basic table:
 Basic Online Class Listing Table
JavaScript Code:
<script type="text/javascript" src="https://app.jackrabbitclass.com/jr3.0/Openings/OpeningsJS?OrgID=XXXXXX"></script>
Direct URL:
https://app.jackrabbitclass.com/jr3.0/Openings/OpeningsDirect?OrgID=XXXXXX
We are going to make the following customizations:
- Filter to create a separate table for Ballet (Cat1) classes using a parameter (variable=value) cat1=ballet.
- Hide the class description column using a parameter (variable=value) hidecols=description.
- Show an additional column for instructors using a parameter (variable=value) showcols=instructors.
 Customized Online Class Listing Table

JavaScript Code:
<script type="text/javascript" src="https://app.jackrabbitclass.com/jr3.0/Openings/OpeningsJS?OrgID=XXXXXX&cat1=ballet&hidecols=description&showcols=instructors"></script>
Direct URL:
https://app.jackrabbitclass.com/jr3.0/Openings/OpeningsDirect?OrgID=XXXXXX&cat1=ballet&hidecols=description&showcols=instructors
Filter (Group) Your Online Class Listing Tables
Use filters to show only a specific group of classes. This should be done before any other customizations.
Example
You have enrollment open in the current Session and want to open enrollment for the upcoming Session, and you'd like to keep the tables separate. You can create two listing tables and use a filter to show a particular Session in each one.
Show Columns in Your Online Class Listing Tables
There are seven columns of information that can be added to the twelve columns included in the basic Online Class Listing Table: Location, Category 1, Category 2, Category 3, Instructors, Duration, and Room.
Hide Columns in your Online Class Listing Tables
Hide any of the twelve columns of information that are included in the basic Online Class Listing Table (Register, Class, Description, Days, Times, Gender, Ages, Openings, Class Starts, Class Ends, Session, and Tuition).
Sort Rows in your Online Class Listing Tables
Once you have customized the information that will be included in your Online Class Listing Tables, you can specify the sort order of the classes within each table.
Customize Scroll Bars and Colors (Advanced)
If you are familiar with using <div> rules, there are a few you can apply to your scripted tables.
Tricks for Query Strings (Advanced)
There are a few special tricks that can be achieved by adding these advanced parameters to the end of a query string.
Frequently Asked Questions
Q. How does the new registrant add Class #2, Class #3, etc., when using the Online Class Listing Tables?
A. The listing tables will pre-fill the selected class into the Registration Form in the Class #1 position. To enroll in additional classes at the same time, the new registrant must use the Select Another Class button on the Registration Form (under the class previously selected). It is not possible to select multiple classes directly from the Online Class Listing Tables. See Modify the Online Registration Form Class Search Page page for more details.
Q. Can I have waitlists and make-ups reflected in the number of openings in my Online Class Listing Tables?
A. Yes! Go to the Gear icon > Settings > Online Registration > Settings (left menu) > Class Search Settings (section), and you can choose to allow a waitlist when the class is full. Also, you decide which conditions should be taken into consideration when the system is determining the remaining number of openings shown for new enrollees.
- Set Allow Waitlist When Class Full to Yes.
- What impacts the number of Class Openings? Set the Waitlist and Makeups rows to Yes for Online Registration to have waitlists and makeups considered when new families register online.
Q. How do I access the HTML in my Content Management System?
A. See Access CMS Source Code - HTML Mode for examples of how to toggle to HTML mode in several CMS systems.
Q. I have a Wix website, and the Online Class Listing Tables are not displaying correctly on mobile devices. What should I do?
A. Wix editors automatically place our class listing table code into an iframe (this is outside of Jackrabbit's control). You must use the Direct Method and add that code to the iframe in Wix. Watch a short video tutorial.
Q. Can I use JSON for my website?
A. Contact our Integration Team for assistance with customized integration. However, please note JSON support is not available through Jackrabbit. Download and view the JSON document here.
Need a hand? We have a team of Integration Specialists ready to help.