Jackrabbit integrates with QuickBooks Online allowing you to save time by exporting your data from Jackrabbit into your QuickBooks company account.
Expand to learn about each step of the export process.
Step 1 - Connect Jackrabbit to QuickBooks Online
The 1st step towards exporting your Revenue is to do a (one-time) setup between Jackrabbit and QuickBooks. This is done from the Transactions menu > QuickBooks Export.

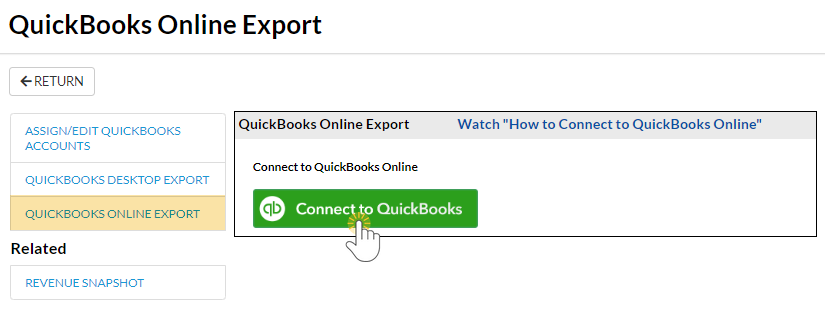
From the left menu select QuickBooks Online Export and click Connect to QuickBooks.
You will be prompted to sign in to your QuickBooks account and select the company file you want to be connected to Jackrabbit. When you are signed in, a new window will open and you will be asked to authorize QuickBooks to share your online data with Jackrabbit. Click the green Connect button to complete the connection.

Once Jackrabbit is connected to QuickBooks another window will display a confirmation that the connection was successful. Your system is now connected to your QuickBooks Online account and will remain so until you disconnect it.
If you wish to end the connection between Jackrabbit and QuickBooks click the Disconnect QuickBooks Online button (only displayed when the connection is active).
Step 2 - Assign/Edit QuickBooks (Online) Accounts
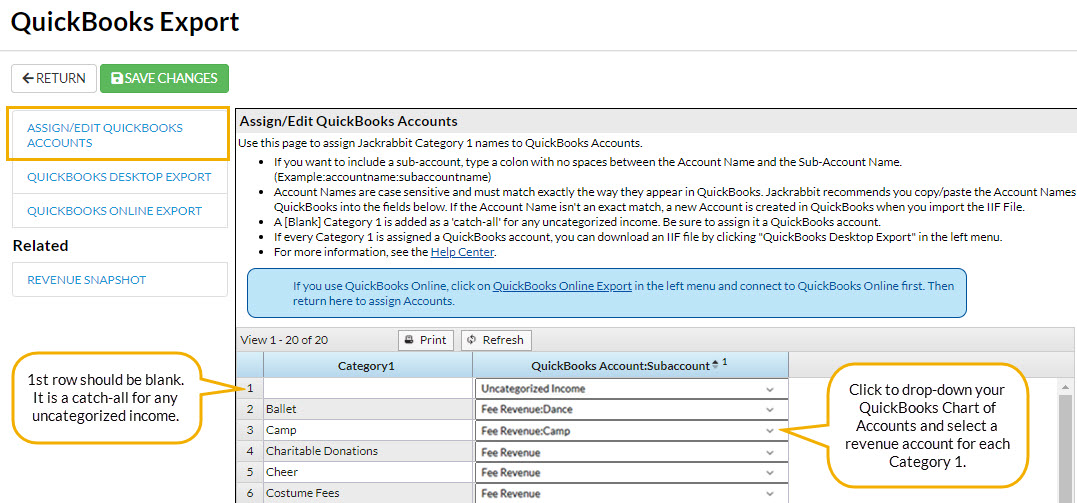
Once you have connected your Jackrabbit system to your QuickBooks account you will need to assign an income (revenue) account from your QuickBooks Chart of Accounts to each of your Jackrabbit Category 1s. These accounts are where all of your revenue will be posted when you bring in the export from Jackrabbit.
If you have any Invalid Accounts, remove any special characters, for example, change the "&" to "and."
From the Transactions menu > QuickBooks Export select Assign/Edit QuickBooks Accounts (left menu).

The first line in the Category1 column is left blank; this is intentional. When a payment in Jackrabbit is not matched to a fee(s) it is considered uncategorized income (i.e. has no Category1). Assign the blank field a QuickBooks account that will draw your attention to the need to reallocate these amounts to an income account.
From the drop-downs in the QuickBooks Account:Subaccount column, select a QuickBooks income account for each Category1.
Step 3 - Export Revenue to QuickBooks Online
When you have connected your Jackrabbit system to your QuickBooks account and have assigned a QuickBooks income account to each of your Jackrabbit Category 1s, you are ready to export your revenue!
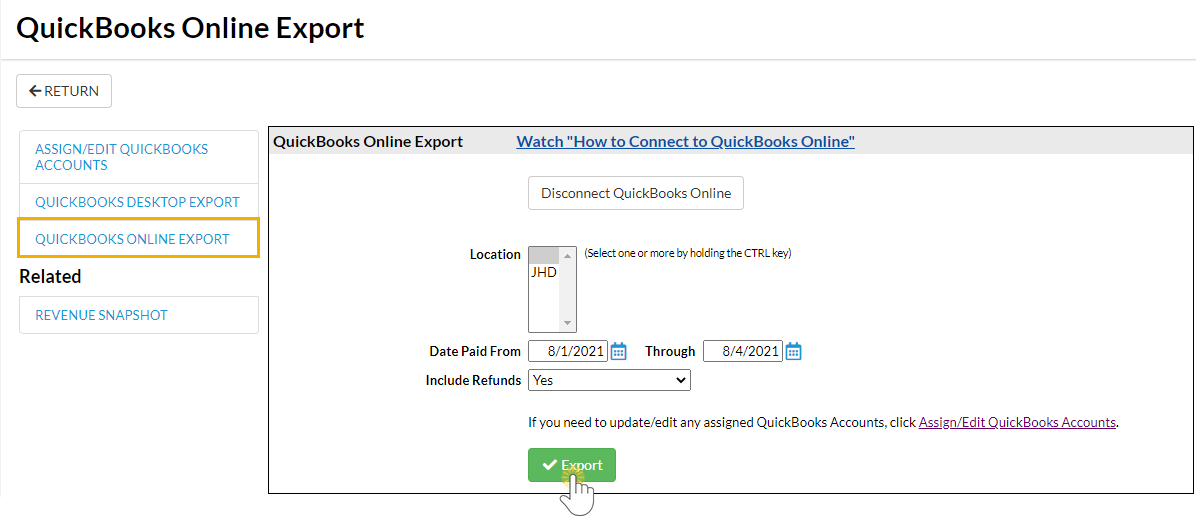
From the Transactions menu > QuickBooks Export select QuickBooks Online Export (left menu). Use the criteria here to choose which transactions you want to export.
- Select which Jackrabbit Location(s) you would like to include in the revenue numbers being exported.
- Enter the date range you wish to export.
- Indicate whether or not to include any refunds you may have done during that time frame.
- Click Export.

When the export has been completed you will be taken to the QuickBooks Online Export Results page which displays the status of the export and includes details about the journal entry that was created in your QuickBooks account. A green Success status indicates that your transactions were successfully exported into your QuickBooks Online account.

The information displayed in the export results will agree to the Revenue Snapshot report run for the same date range. The Revenue Snapshot report can be considered the 'backup' for the journal entry. There is a link to this report in the QuickBooks Online Export menu. It can also be accessed from Transactions > Transaction Reports.
The Revenue Snapshot for the export pictured above looks like this:

The journal entries posted in QuickBooks will include Debits and Credits that both add to the same total (in bookkeeping debits must equal credits in a journal entry). These journal entries summarize the payments transactions and the associated Category 1s for each day in the exported date range. Note: Family/Account names and individual transactions are not exported, this detail is kept in Jackrabbit.
- The debits in the journal entry are the payments you received from your customers broken down by payment method. They are posted to Undeposited Funds in your QuickBooks Chart of Accounts. Use the QuickBooks Bank Deposits feature to move the payments from the Undeposited Funds account to your QuickBooks Bank account(s) as payments are deposited into your bank account. Learn more about recording and making bank deposits in QuickBooks Online.
- The credits in the journal entry are the different Category 1s those payments were linked to. They are posted to the QuickBooks Revenue accounts you have assigned to them (Transactions menu > QuickBooks Export > Assign/Edit QuickBooks Accounts).

Frequently Asked Questions
Q. How do I deal with taxes when exporting my data to Quickbooks?
A. Taxes are not broken out in the QuickBooks import; the amounts posted to your income accounts in your QuickBooks account will include the tax component. Run a Paid Fees Report to see the tax amounts and create a journal entry in QuickBooks to back those amounts out of your revenue.
Important to Note
- Jackrabbit's QuickBooks integration does not feed into the QuickBooks tax functionality. If you are using the Sales Tax feature in QuickBooks Online, do NOT use the Jackrabbit export. Instead, create a ‘sales invoice’ in QuickBooks to enter Jackrabbit revenue into QuickBooks. Use the Revenue Snapshot report and a Paid Fees report, which shows taxes, to back out the tax and get the numbers needed to complete the sales invoice in QuickBooks.
- If your QuickBooks Online company account is connected to your bank and you download transactions, avoid duplicate transactions by using the QuickBooks option For Review to match downloaded transactions to the payments you've exported from Jackrabbit. Learn more about Categorizing and matching online bank transactions in QuickBooks Online.
Jackrabbit is not able to offer support for your QuickBooks product (including, but not limited to account settings and the adding/editing of journal entries due to Reconciliation). Please refer to QuickBooks documentation or their support desk for assistance.

