Use this report to customize statements and email them to multiple families at once. This may include using the Search Criteria to generate statements by Enrollment Status and by Category 1, 2, or 3 as needed.
Note: Select one or more Categories, Students, Transaction Types, and Sub-types by holding down the CTRL key.
- Go to the Families menu > Family Reports > Statements - Email.
- Use the Family/Account Search Criteria to select the families whose statements you want to email. If you leave all the criteria blank (with Enroll Status = Currently Enrolled), you will get a complete list of enrolled families. You can narrow down the selection:
- Select Single Family Account with the option to select one or more students when you check off Email Statement by Student(s) and select the students from the drop-down list.
- Select Families Enrolled in Class (search for a specific class).
- Select Families Enrolled with Instructor (select an instructor from the drop-down list).
- Use Transaction Search to narrow down the types and dates of transactions you want to appear on the statement.
- Use the Format Options section to create the 'look' of the statement by selecting which family and transaction information to include. Logo, header, and footer settings are also customized here.
- If you regularly use the same Statement Header and/or Footer, you can create defaults in
Gear (icon) > Settings > General > Statements (left menu). If you need to change the default for one set of statements only, you can edit the header/footer while on the Statements - Email screen.
- If you regularly use the same Statement Header and/or Footer, you can create defaults in
- Define reply and blind-copy email addresses in the Email Information section of the Format Options. A Reply To Address is required. An email subject and header can also be added here.
- Click the Preview Email Statements List button (top left). This is a preview only. No emails are sent until you click Send Emails.
- Review the statement list. Note that families/accounts that have no home email address listed under the contact that has Billing Contact=Yes will display but with no checkbox to send.
- Click the View link to review specific statements.
- Click the Delete link to delete a specific statement.
- Determine which statements to email by either selecting Check All Rows or checking specific family/account checkboxes.
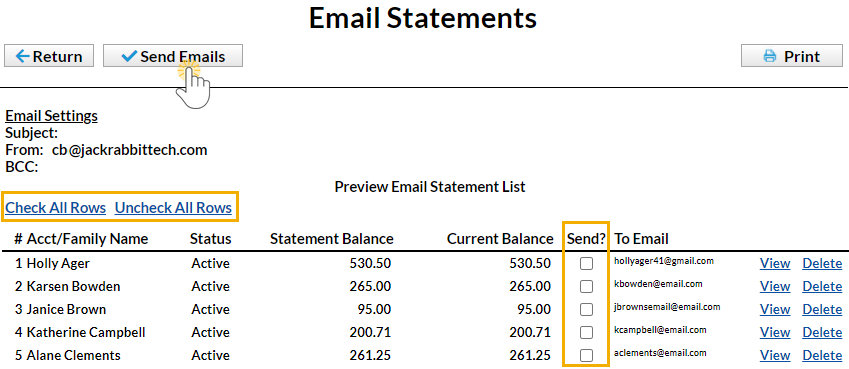
- Click Send Emails to email the statements.
- When email statements have been completed, a pop-up window will indicate Finished. Sent x email(s). Click OK.

Create Favorites for frequently used statement settings. See Favorites - Save Your Report Criteria Selections for instructions.
Sample Email Statement

Save a frequently used report for quick and easy access! Click the Heart icon![]() next to a report name to change the heart to red
next to a report name to change the heart to red![]() and add the report to your Reports menu > My Reports.
and add the report to your Reports menu > My Reports.