Parent Portal Settings are organized into several sections. These settings allow you to customize the information families can access and the actions they can perform in the portal.
Go to the Gear icon > Settings > Parent Portal and follow the instructions in this article to help you set up your Parent Portal.
Note: Changes made on the Parent Portal Settings page are saved automatically.
Select a heading to expand the section and learn more.
Display Settings
Click the Go to the Parent Portal quick link to access the login page. Make sure the Activate Portal checkbox is selected - this enables Parent Portal access and will also add a direct login link for existing customers to the top of the Online Registration Form.

The following settings control what families will be able to see when they are logged into their Parent Portal accounts.
| Transactions |
Determines what appears on the Billing & Payments page. When selected, recent transaction activity is shown, and parents can view, sort, and filter their account transaction history. |
| Students |
Controls the visibility of the Students section under Account. When selected, families can quickly view each student’s schedule, summary details, and photo (if one is uploaded). They can also click on a student’s card to see more detailed information. Additionally, new students can be added directly from this section. |
| Student Schedule |
Controls the My Schedule section on the Dashboard and the Enrollment option on the Student page. Both sections show the student’s classes, Appointments, and any waitlisted classes. |
| Enroll |
When selected, the Enroll menu option lets parents search for classes by selecting Activities > Find Classes. If enrollment through the Parent Portal is disabled, parents can still view class details but will see a message prompting them to contact your organization directly to enroll. |
| Event Registration |
Controls the ability to enroll in Events. When selected, a Find Events option becomes available under the Activities menu. Parents can browse events and register either a student or the whole family, depending on event settings. |
Communication Settings
These settings manage your email communications, login message, and if the Parent Portal video is visible on the login page.

| "Reply to" and "Send Alert to" Email Address(es) |
Provide the email address where you want to receive notifications for enrollments, payments, and parent messages.
|
| Send email alert to your organization for |
Select which Parent Portal activities you would like to receive an email alert for - Updates to Policies, Updates to Payment Method, and/or Student Enrollments. |
| Send email alert to parent for |
Select the checkbox to send an email to the parent's email address on file when a student is enrolled in a class. Optionally:
|
| Login Page Message |
Text entered here appears in a pop-up window on the Parent Portal login page, which is visible to all users before they sign in. This is a great spot for a welcome message or important announcements you'd like to share with all families. HTML is supported for formatting. |
| Show link to Portal video on Login Page |
When selected, a Watch Video link will be available for your parents to watch a quick instructional video on the Parent Portal. |
| Portal Video Message |
This text field is only available when the Show link to Portal video on Login Page is selected. Text entered here will appear before the Watch Video link and can be used to bring attention to what the video offers. |
| URL Slug for SEO | Customize the last part of your Parent Portal link to include keywords that reflect your program or organization (e.g., app.jackrabbitclass.com/ParentPortal/your-slug-here).
This helps search engines recognize your portal and improve its visibility in search results, making it easier for new families to find you online and register. |
Family Information Settings
This section determines what parents can do inside their Parent Portal.
|
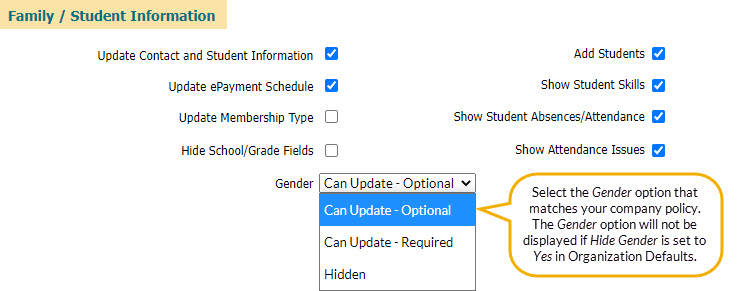
Update Contact and Student Information |
Controls the ability to update phone numbers, email, addresses, student birthdate, etc. |
| Update ePayment Schedule |
Allows the parent to update the family's ePayment Schedule (located on the Billing Info tab of the family record). |
| Update Membership Type |
Allows the parent to update the family's Membership Type (located on the Billing Info tab of the family record). |
|
Hide School/Grade fields |
Option to hide these fields in student details. |
| Gender |
Controls the options for student gender selection. If hidden, the gender option will not be displayed in the Parent Portal.
|
| Add Students |
Allows the parent to add new student to their family account. |
| Show Student Skills |
If tracking skills in Jackrabbit, parents can see student skills and instructor notes on each Student's page. |
| Show Student Absences/Attendance |
Controls whether or not the Absence or Attendance tab is available in the student record in the portal. |
| Show Attendance Issues |
Attendance issues are when a student has been marked present and additional details have been added (Late, Left Early, Observing). Choose to show this information to parents in the Parent Portal or hide it. |
Family and Student User Defined Fields
Define which of your custom User Defined Fields are able to be seen and edited in the portal. User Defined Fields are customized from the Gear icon > Settings > General > User Defined Fields (left menu) and can be used on the Online Registration Form as well as shown inside the Portal. Responses that parents provide through their portal appear on the Misc tab of both Family and Student records.

To view recent changes to these fields made in the Parent Portal, go to Reports > Find Reports > Families/Students > Recommended tab, and open the Parent Portal Log report. Enter a date range and filter by User Defined Field Changes.
Fees & Payments Settings
These settings determine which transaction details are shown in the Transaction History section under Billing & Payments in the Parent Portal.


My Classes Settings
These settings control what information is displayed in the class cards seen in My Schedule (Dashboard). If a student is on a waitlist for a class, the class will be shown below the enrolled Classes.
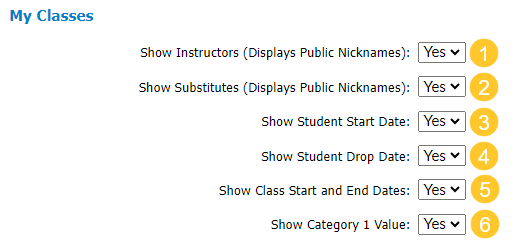

| Show Instructors
(Displays Public Nicknames) |
To display instructors on class cards in the Parent Portal, set this option to Yes. If a nickname is entered in the staff member’s record, it will be shown. When set to No, instructor details will be hidden from view. |
| Show Substitutes
(Displays Public Nicknames) |
To have substitute information displayed on class cards in the Parent Portal, set this to Yes. Parents can select the Upcoming Substitutes link to view details. When set to No, no information about the substitute will display. |
| Show Student Start Date |
This displays the student’s enrollment date. If the class hasn’t started yet, the class start date will be shown instead. |
| Show Student Drop Date |
Display a scheduled future drop date for a student, if one has been set. |
| Show Class Start and End Dates |
When selected, this option displays the class start and end dates as defined on the Summary tab of the Class record. |
| Show Category 1 Value | When set to Yes, the Category 1 value on the class will be displayed in the Parent Portal on all schedule pages. |
Class Enrollment Settings
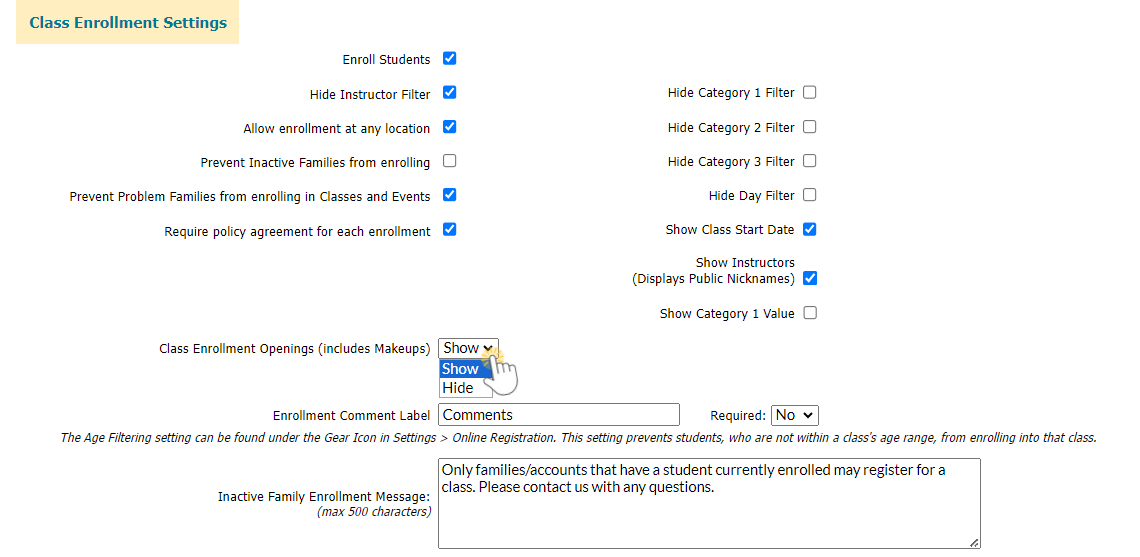
| Enroll Students |
Select to allow parents to enroll students in classes and events in the Portal. |
| Hide Instructor Filter |
Hide the option to filter classes by an instructor. |
| Allow enrollment at any location |
Select this option if you have multiple locations and want to allow families to enroll in classes or events at any location. |
| Prevent Inactive Families from Enrolling |
Select to prevent inactive families (no actively enrolled students) from enrolling in classes. |
| Prevent Problem Families from enrolling in Classes and Events |
When selected, this setting will prevent families flagged as a Problem Account from enrolling in classes and events. |
| Require policy agreement for each enrollment |
Select this checkbox to require families to agree to your policies each time they enroll a student. |
| Class Enrollment Openings
(includes makeups) |
Display or hide the number of available spots in each class listing. Scheduled makeups are included in the opening count. Classes with 5 or fewer openings appear highlighted in orange. If you plan to use online waitlisting, we recommend keeping the Openings column visible. |
| Enrollment Comment Label |
Use this text field to ask a custom question during enrollment. The response will appear in the enrollment notification email. Define whether this is required or not. |
| Inactive Family Enrollment Message |
Use this when you have also selected Prevent Inactive Families from enrolling. Text entered here will display to an inactive family if they attempt to enroll. |
On the right are settings that control the listing of classes in the Parent Portal.

Control whether parents can narrow their class search by showing or hiding the Category and Day filters. This only removes the filtering options - the columns will still be visible in the class listings.
Choose whether or not to show the Class Start Date, Instructor Nickname, and/or Category 1 Value in the listing of classes.

Tips regarding filters
- You can change the Category labels to words that are more descriptive to your parents. For example, you can rename Category 1 to Program or Type. Go to the Gear icon > Settings > Online Registration > Settings (left menu)> Class Search Settings.
Note: This affects both the Portal and Online Registration Form display. - You can eliminate certain Categories from the drop-down selection list. For example, you may have a Category 1 called Costume Fees that you use for revenue reporting only and don't want your parents to see this in the Portal. To prevent non-applicable Categories from being listed as a choice in the drop-down filter list, go to the Gear icon > Settings > General > Drop-down Lists (left menu) > Category 1 (or 2 or 3), and select the Hide from customers checkbox by any Category that you do not want to appear as a filter selection
Note: This affects both the Portal and Online Registration Form display.
Accepting Donations
Jackrabbit offers the ability to collect charitable donations from your families in the Parent Portal and allows you to set the donation amounts.

See our Help Center article Accept Charitable Donations in Jackrabbit for setup instructions and more details.