Appointment Types are created for each type of booking you'll offer, such as private lessons, auditions, volunteer hours, etc.
Four drop-down values are used with Appointments: Transaction Type (Debit) and Category 1, 2, and 3. Consider adding new values to customize your reporting. Learn more about Customizing Drop-down Lists.
Appointment Types are created in a four-step process. Select a heading to expand the section and learn more about each step.
Step 1 - Details and Availability Window
- Go to the Activities menu > Appointments > Appointment Types and click the Add Appointment Type button.
- Add an Appointment Type Name (required) and a Description (optional) in the Details section. Note: The Description field is visible to Jackrabbit Users in the system and to parents in the Parent Portal.

- In the Availability Window section, set when this type of appointment is available and can optionally associate it with staff and room availability.
- Add a Start Date (required) and an End Date (optional).
- Clear the Block this Appointment Type on Closed Dates checkbox to allow this type of appointment to be booked on designated Closed Dates. When selected (default), this option prevents booking on those days.
- Select the Active Days (the days of the week the Appointment Type will be available) and specify the time range during which it will be offered on those days.
- Use the Adjust Duration link to edit the length of this Appointment Type on the fly (the default is 30 minutes). Otherwise, you can do this in Step 2.
- Click the Plus icon
 to add another time block to any day.
 - Copy the hours from the first day to the remainder of the days with the Copy to All option
 .
.
 Optionally, associate Staff Availability and room availability to ensure those resources are factored in when finding available booking times, alongside selected days and times and a student's schedule.
- Use the Associate Staff Availability link to select the staff you would like to associate with this type of appointment.
- All active staff will be listed. Use the Search field to quickly locate a staff person when there are many.
- A No Availability badge
 will display next to any staff person whose availability has not been entered in their Staff record (Availability tab). Note: No appointment booking times will display for that appointment when that staff person is selected during the booking process.
- Use the Associate Room Availability link to choose the rooms you would like to associate with this type of appointment.
- When a room is associated with an appointment, Jackrabbit ensures that only available times are shown by checking for any scheduled classes, events, or appointments in that room. It also factors in staff associations and time availability, returning only times when the room, staff, and student are all free.
- Use the Associate Staff Availability link to select the staff you would like to associate with this type of appointment.
- Select Next: Scheduling & Thresholds to move on to Step 2.


 Optionally, associate
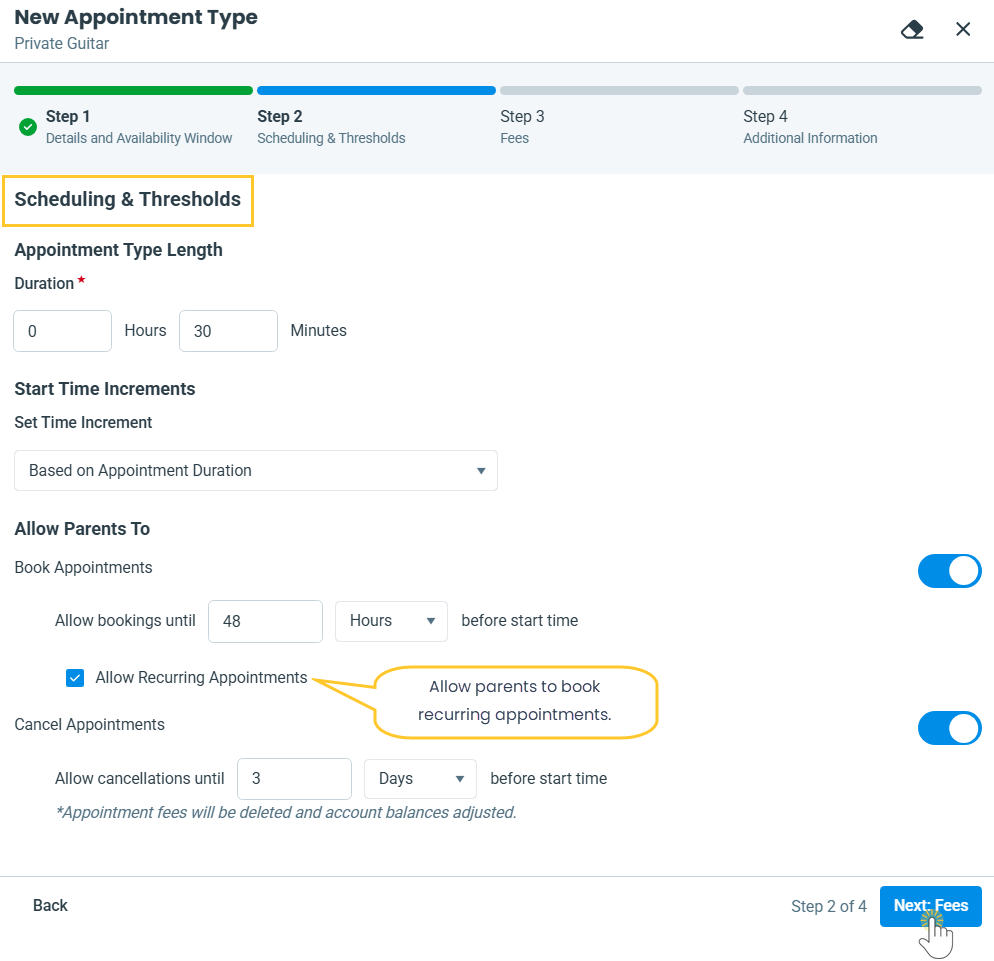
Step 2 - Scheduling & Thresholds
- Change the Duration of this type of appointment if needed; the default is 30 minutes.
- Adjust the Set Time Increment setting to control how frequently time slots are available. You can align start times with the appointment duration or choose a custom interval. This flexibility allows appointments to be booked every 5, 10, 15 minutes, or any other increment within the hour.
- In the Allow Parents To section:
- Turn on the Book Appointments and Cancel Appointments toggles to enable parents to manage appointments in their Parent Portal. Then, specify how far in advance they can book and how long before the appointment they can cancel.
- If Book Appointments is toggled on, select the Allow Recurring Appointments checkbox to allow parents to book recurring appointments in the Parent Portal for this type of appointment. If left unchecked, parents can only book a single appointment.
Note: Recurring appointments let parents book multiple appointments at once on a repeating schedule (e.g., every Wednesday at 4:30 PM for five reccurrences).
- Select Next: Fees to move on to step 3.

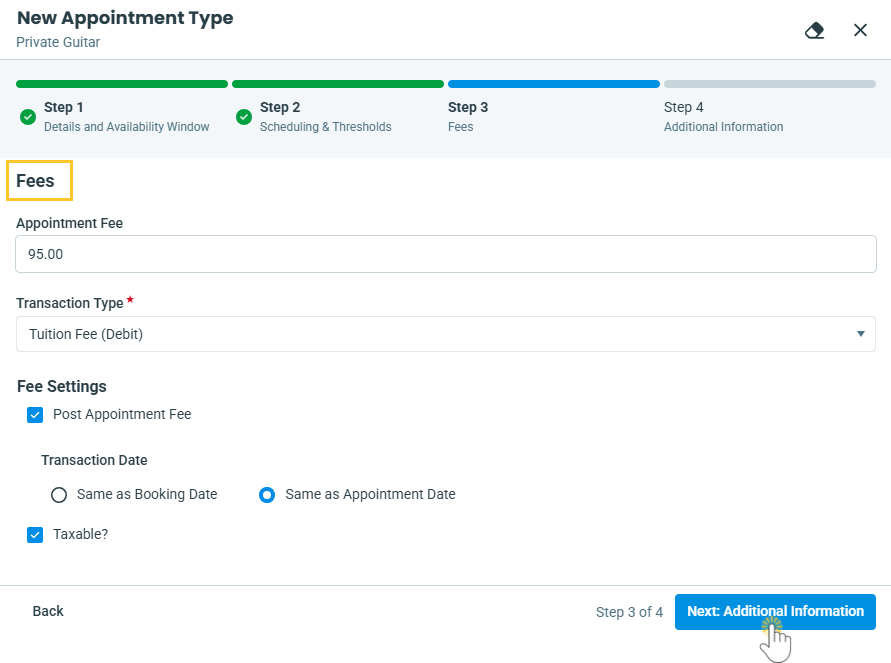
Step 3 - Fees
- Define the Appointment Fee if applicable.
- Choose the Transaction Type (required when a fee is assigned) to use when the fee is posted.
- Select Post Appointment Fee to automatically post the fee and choose whether to post the fee based on the date the appointment is booked or the actual date of the appointment. Note: No payment has been processed at this time; the fee has been posted to the Family account.
If you choose to post fees based on the appointment date and have scheduled ePayment tasks, future fees may be collected unintentionally. To prevent this, review the Payment Settings in your scheduled ePayment tasks.
- Select Taxable? to apply taxes to the Appointment Fee. If you do not want the fees to be taxable, clear the checkbox to prevent taxes from being applied.
- Select Next: Additional Information to move on to step 4.

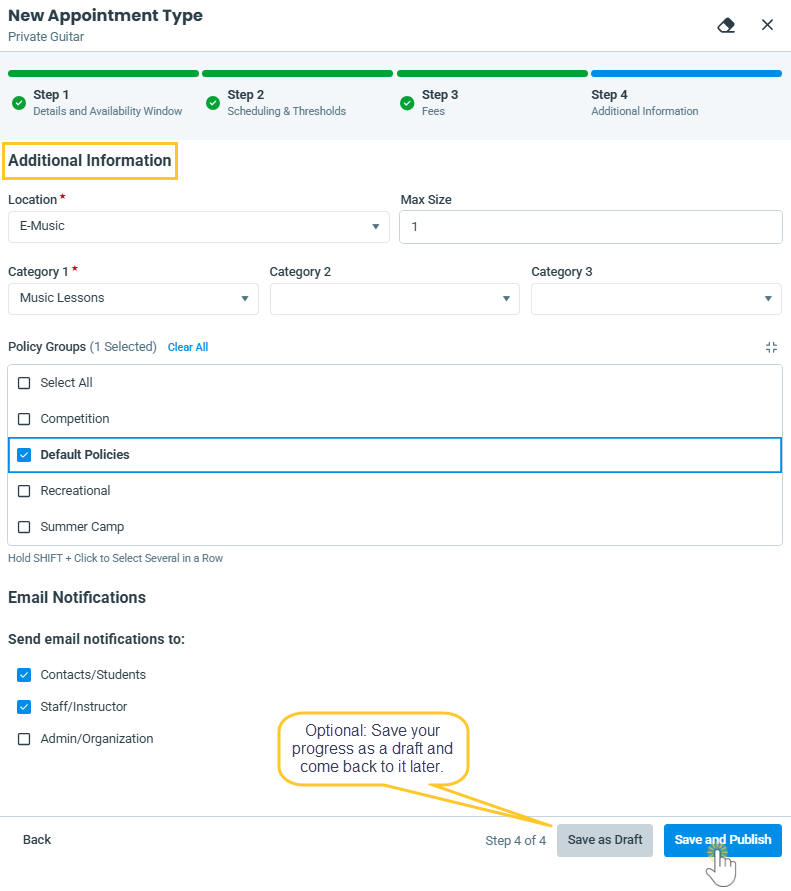
Step 4 - Additional Information
- In the Additional Information section, select a Location (if applicable) and a Category 1; both are required fields.
Optionally:- Change the Max Size to a value greater than one (the default) and select a Category 2 and Category 3.
- Select the Policy Groups that need to be assigned to the Appointment Type. This specifies which policies families must agree to when the appointment is booked.
- Choose who you'd like to Send email notifications to. By default, email notifications are set to be sent to the Contacts/Students, Staff/Instructor, and Admin/Organization. Clear a checkbox to prevent the email notification from being sent to those individuals.
- Select Save and Publish to begin using the Appointment Type, or save it as a draft and come back to complete it later.

The newly created Appointment Type is now listed on the Appointment Types page (from the Activities menu > Appointments), where you'll manage the different types of appointments you offer. Badges will display to inform you which Appointment Types are in draft ![]() and which are incomplete
and which are incomplete ![]() and missing information.
and missing information.