Lesson Plans are a great way to provide your instructors with guidelines to help them run successful classes.
- Set clear well-defined expectations for classes.
- Create and copy Master Lesson Plans into a Class record or create a Lesson Plan directly in a Class record.
- Allow your instructors to view Lesson Plans in the Staff Portal.
Create a Master Lesson Plan
Master Lesson Plans are created, edited, and deleted as follows:
- Go to the Classes (menu) > Master Lesson Plans.
- Click Add Lesson Plan. Name the Lesson Plan and enter a Description.
- Click Save Changes. When prompted, click OK.
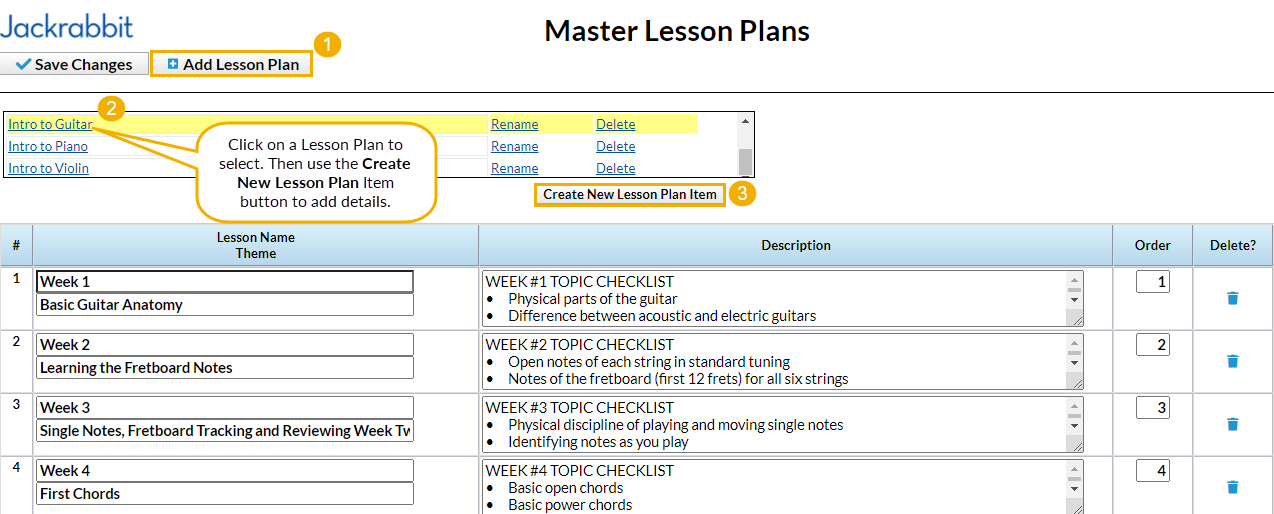

Add Items to a Lesson Plan
- Select and click the Lesson Plan name.
- Click Create New Lesson Plan Item. In the pop-up window, add item Name, Theme, Description, and Order.
- Click Save. Continue adding Lesson Plan items until the Master Lesson Plan is complete.
- Click Save Changes.
Lesson Plans assigned to classes can be viewed in the Staff Portal.
Copy a Master Lesson Plan into a Class
- Go to the Classes (menu) > All Classes to choose the correct class or use the global search for find a class... on the top of the page.
- Click the Lesson Plan tab.
- Click Copy Master Lesson Plan. In the Copy Master Plan box, choose the applicable Master Lesson Plan.
- Click Save and OK. The Master Lesson Plan you added will show in the Class.
Note: Instructor-specific Dates, Instructor Comments, and Order can be added as needed. - Click Save Changes.
Add a Lesson Plan Directly to a Class
- Go to the Classes (menu). Search and select the correct class.
- Click the Lesson Plan tab.
- Click the Add Lesson Plan button.
- Add applicable items: Date, Lesson Name/Theme, Description, Instructor Comments, and Order.
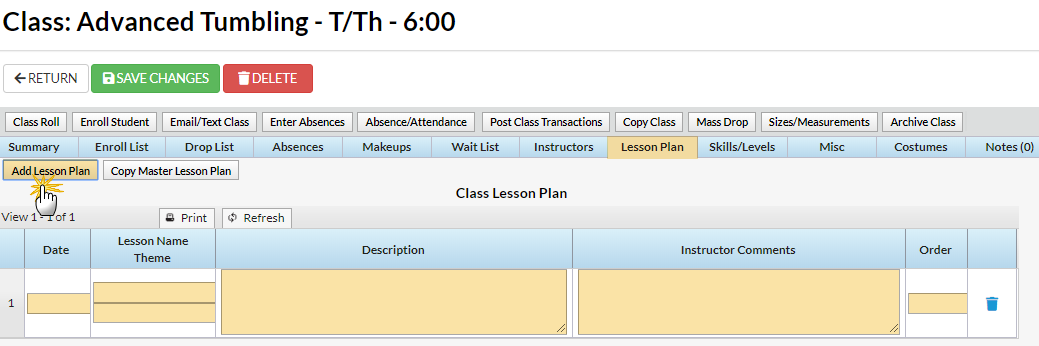
- Click Save Changes.

Lesson Plans added to an individual Class using the Add Lesson Plan button will not be added to Master Lesson Plans.