At Jackrabbit, we believe all students should feel welcome, safe, and included in their daily lives as their authentic selves.
We help to make this possible by allowing you to define gender options beyond male and female. You can add as many gender options as you want! When you offer more than the traditional male and female gender responses, you're saying "I see you, and you're welcome here" without ever saying a word.
Using someone's chosen name and pronouns is another way to show respect and create an inclusive environment. Jackrabbit offers a way to capture this information and display it on Class Rolls and in the Staff Portal.

Three things to know about gender inclusivity in Jackrabbit:
 | Gender can be hidden globally. If you don't filter classes by gender, you can opt to hide all gender fields throughout your Jackrabbit system:
|
| Gender options are customizable and Gender-inclusive terminology is used. The drop-down list options for gender are customizable, allowing you to create the options that best suit your clientele. There is a huge advantage here as parents aren’t forced to choose between two traditional options that their child may or may not fit into. Within Jackrabbit, you will find ‘All’ is an option in gender drop-down lists in addition to the values you create. Previously we used ‘Both’ but with more than two possible gender options, ‘All’ better fits the gender inclusion we strive to achieve. |
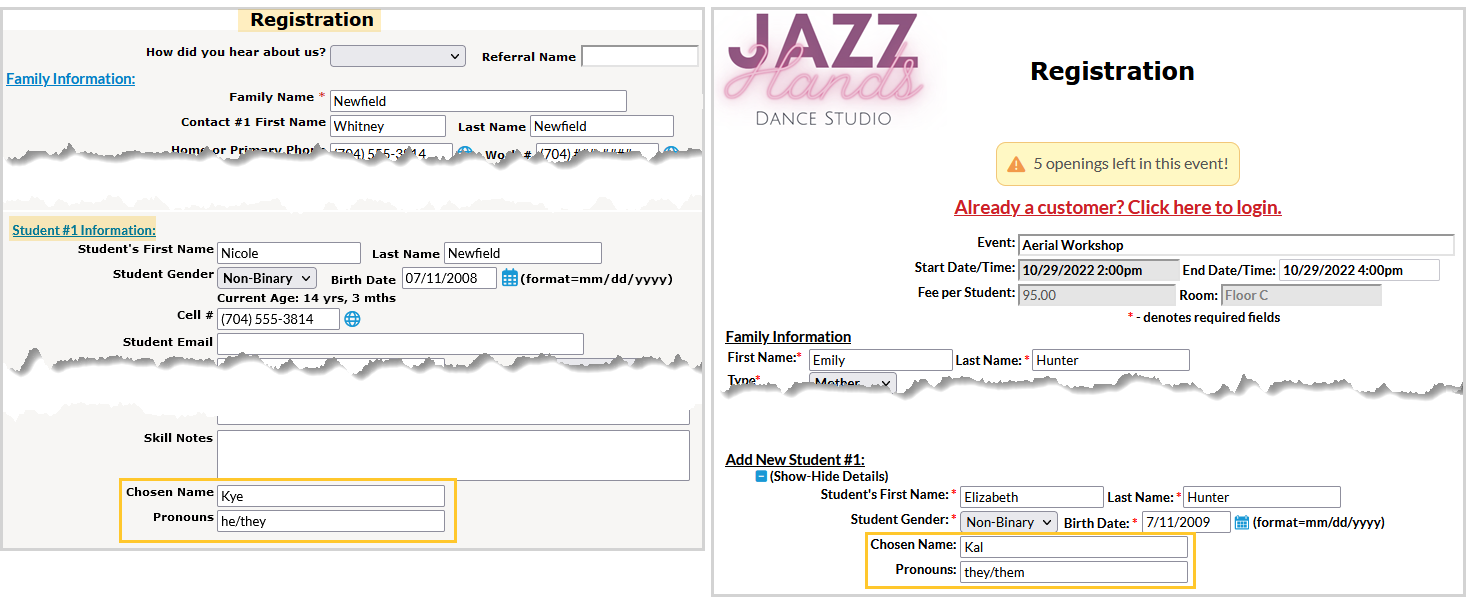
| Chosen names and pronouns can be captured during Online Registration. Student User-defined fields can be used to capture chosen names and pronouns during Online Registration. This information can also be added afterward. On Class Rolls and in the Staff Portal, these fields can be displayed so instructors don't have to make assumptions and can respect their students' gender identities. |
The How-To
Now that you know what options Jackrabbit offers for gender inclusivity, let's look at how to adjust settings and use fields to capture pronouns and chosen names.
Hide Gender
The Hide Gender setting in the Student Settings section of the Organization Default settings controls whether or not gender is used.

This setting defaults to No, i.e., gender options are available throughout Jackrabbit. Change this setting to Yes to remove all gender references in Jackrabbit.
To adjust this setting, go to the Gear icon > Settings > General and scroll down to the Student Settings section. Select Yes and Save Changes. After you log out of Jackrabbit and then back in, you'll see there are no longer any references to gender, as outlined above.
Customize the Gender Drop-down List
If you have not hidden gender, you'll be able to customize the drop-down list options for a student's gender.
To add drop-down list values for custom genders, go to the Gear icon > Settings > Drop-down Lists (left menu). Scroll down to the Student section and select Gender. Use the Add Row button to add gender options and Save Changes. Log out and back in to see the changes.

Capture Chosen Names and Pronouns
For instructors, using appropriate names and pronouns is an important way to support their students' feeling of belonging. Empower them by displaying this information on their Class Rolls and in the Staff Portal.
Here's how:
Step 1 - Add Student User-defined Fields
Go to the Gear (icon) > Settings > General > and select User-defined Fields to customize the labels for the fields. In the Student User-defined fields Label section enter the labels and Save Changes.

Step 2 - Customize the Online Registration Form
Go to the Gear (icon) > Settings > Online Registration > select Field Options/Labels (left menu) and scroll down to the Student User-defined fields section.
For each of the fields you are using to capture chosen names and pronouns, use the drop-down menu to make them Optional. Families with students who have chosen names and pronouns can enter their information, while those without can leave them blank.

These fields will now appear on your Online Registration Form.

They will also display on your Quick Registration Form and Event Registration Form.
Step 3 - Add Information to Roll Notes
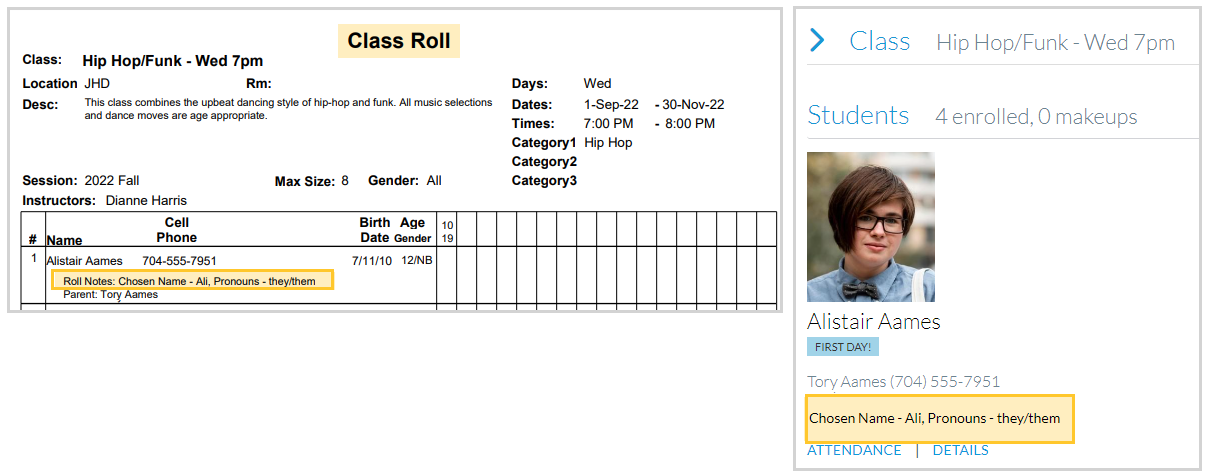
When registrations come in with the Chosen Name and Pronouns fields completed, you'll need to transfer the information into the Roll Notes field so that it will display on Class Rolls and in the Staff Portal.
Go to the Student record > Misc tab, enter the information from the User-defined fields into the Roll Notes field, and Save Changes.

The Chosen Name and Pronouns fields will now be visible on Class Rolls and in the Staff Portal.
Pro Tip!
Create a report using All Students to ensure that you've transferred all information captured in the User-defined field into the Roll Notes field.
Go to Students (menu) > All Students. Click on any column menu ( ) to select the Roll Notes and User-defined fields columns. Sort the User-defined fields columns to bring them to the top.
For every student that has information in the User-defined fields, there should also be information in the Rolls Notes field. If that field is empty, use the link to the student's record and add the information to the Roll Notes on the Misc tab.

Save this grid view as a Favorite so you can quickly and easily verify that all information has been transferred.
Check out these great Jackrabbit Blog articles Everything You Need to Know About Jackrabbit’s Gender Inclusion Initiative, Creating gender-inclusive policies at your youth activity center, and Providing a Gender Inclusive Space Where Students Can Thrive.