Streamline operations, reduce admin time and cost, and increase parent engagement. Sound good?
With the Self Check-in feature, parents and students can bypass the front desk and check in independently. The student's attendance will be automatically recorded in Jackrabbit, eliminating the need for paper class rolls or the use of mobile devices on a slippery pool deck to take attendance.
No special equipment is required. For Self Check-in, you only need a dedicated device (e.g., tablet or phone), a laptop, or a desktop computer; it's mobile-friendly and supports physical and virtual keypads.
Set Up Self Check-in
In addition to selecting the directly related Self Check-in Settings, there are a few other things to look at before Self Check-in can be launched.
|
User Permissions |
Two User Permissions control the Self Check-in feature:
To edit User Permissions, go to the Gear icon > Settings > User IDs (left menu). Select a User ID and then select User Permissions (left menu).
|
|
Requirements for Classes and Families |
Class Record
Family Record
|
| Staff PINs |
To authenticate and open Self Check-in for use, a staff member must enter a unique 6-digit PIN that opens the Parent Welcome page. Decide which staff members will have a PIN. Note: The PIN does not provide access to your Jackrabbit data; Self Check-in operates outside Jackrabbit. Go to a Staff record > Summary tab and select the Email PIN Setup Link button. The staff member will be emailed with instructions on creating their 6-digit PIN. Once the staff member has created their PIN, it’s visible (but not editable) on the Summary tab of their Staff record and on the Active Staff page (Staff > Active Staff). |
| Internet Browser Autofill |
We highly recommended disabling the Autofill/Auto-Complete browser settings on the device used for Self Check-in. Autofill is a feature used in several browsers to help prevent you from filling out fields over and over again. This could cause an issue while using Self Check-in due to autofill filling out unintended fields.
Note: Check to be sure you have the most up-to-date browser on the device you use for check-in. |
With User Permissions set, Class and Family records confirmed, Staff PINs created, and browser autofill disabled for Self Check-in, you're now ready to fine-tune the Self Check-in Settings to control its behavior.
Go to the Gear icon > Settings > General > Self Check-in (left menu). On the Self Check-in Settings page, links on the right menu allow you to navigate quickly to any settings section.

Select a heading below to expand the section and learn more.
Self Check-in Link
This section displays the URL (link) used to launch the Self Check-in Startup page, where a staff person enters their PIN and opens Self Check-in. Easily copy this link to send to other devices using the Copy Link button💥. The Go To Self Check-in link will take you directly to the Self Check-in Startup page🪄.
Attendance Options
Choose your preferred Attendance Option for managing attendance when a student does not check in for a class.

| Automatically Mark Students Absent |
When a student does not check in for class, they are automatically marked absent, and the absence is noted with the UserID “Self Check-in.” This can be changed by a Jackrabbit User or in the Staff Portal if a student comes in late, for example. Attendance is completed automatically with this option. Note: If your Makeup Scheduling rules don’t require lead time and you restrict makeups from exceeding class size limits, you may want to disable automatic absence reporting. This prevents last-minute makeups from being scheduled into an absence before the original student checks in. |
| Do NOT Mark Students Absent | Students who don't check in for class are not automatically marked absent. Attendance for the class is considered incomplete in both the Staff Portal and the Incomplete Portal Attendance alert on the Executive Dashboard until an absence is entered manually by a staff person to complete attendance. |
General Information

Check-in Windows

Use the Check-in Windows to specify how long before a class's start time a student is allowed to check in (early check-in) and how long after a class has started they are still allowed to check in (late check-in). When no check-in windows are defined (the boxes are not selected), a student can check in to classes at any time.
- Classes that have not yet reached the early check-in time will display but will not be available for selection, and the class card will display the time until check-in.
- When a student has multiple classes that day, the class start time of the 2nd class is compared to the class end time of the 1st class. This continues sequentially for the day's classes. If the window is met, check-in is allowed. This prevents students from having to check in over and over when they have back-to-back classes.
- Classes that have already started and are past the late check-in window will display but will be disabled. The class card displays a message that the class is in progress and advises them to see the front desk.
Time updates in real-time within Self Check-in .
Example
A student’s class starts at 11:00 a.m. It is currently 10:43 a.m., and the early check-in window is 15 minutes. When they start to check in, the 11:00 a.m. class is disabled, and a message displays 00 hr 2 mins til Check-In. If they are still logged in to check-in at 10:45 a.m., the message disappears, and the class card becomes enabled for check-in.
Confirmation Page

Optionally, add custom messaging to the confirmation page that displays to the parent/student when they have finished checking in. The character limit for the text is 500, with basic text editing abilities. Select the Add Confirmation Text checkbox to open the editor.
An expiration date can be set, allowing you to display a message until a specified date.
Student Messaging
Nurture your relationship and provide a personalized experience using the Self Check-in student messaging options.

- The messaging options default to not showing the message. Use the toggle switches to show them.
- If a student’s birthdate doesn’t fall on a class date, it will display on the first class date after the birthdate (as long as the next login is within 7 days of the birthdate).
- Default graphics are provided, or you can customize and upload your own (ideal size is 400px x 400px).
- Each messaging option allows you to add an additional message (up to 200 characters) to further personalize the experience.
- Preview links allow you to quickly see how your messages will look.
Open Self Check-in
The first step is to open the Self Check-in Startup page.
From the Self Check-in Settings (Gear icon > Settings > General > Self Check-in), there are two options to open the Startup page:
- Select the gray Copy Link button to paste the link into a tab or send the link to a staff member who can launch the Self Check-in for the day.
- Use the blue Go To Self Check-in link to open the Self Check-in Startup page in a new tab.
Notes:
- Self Check-in does not time out; it will stay open unless the browser it's opened in is closed or the history is cleared.
- Multiple Self Check-in stations can be open at the same time.
Enable full screen mode to remove toolbars and distractions to prevent users from navigating away from Self-Check-in.
- Select the Lock URL icon below the keypad to enable full screen mode.
- Use the Unlock URL icon or press the Esc key on your keyboard to display the full browser and exit full screen mode.
Note: Apple users should update to the latest version of iOS to ensure proper functionality of this setting.
Enter a staff member's unique six-digit Staff PIN and select the Open Self Check-in button to open the Welcome screen, and Self Check-in is ready for use!

The Self Check-in Workflow
The Welcome screen is where the parent or student enters their Primary Phone Number, selects the student or students, and starts the Self-Check-in process.
- Your organization's logo will appear on the Self Check-in pages if one has been added in your General Settings (under the Gear icon). If no logo has been uploaded, your organization's name will be displayed.
- Once a parent or student has started the check-in process, it will reset to the Welcome screen after 90 seconds of no activity.
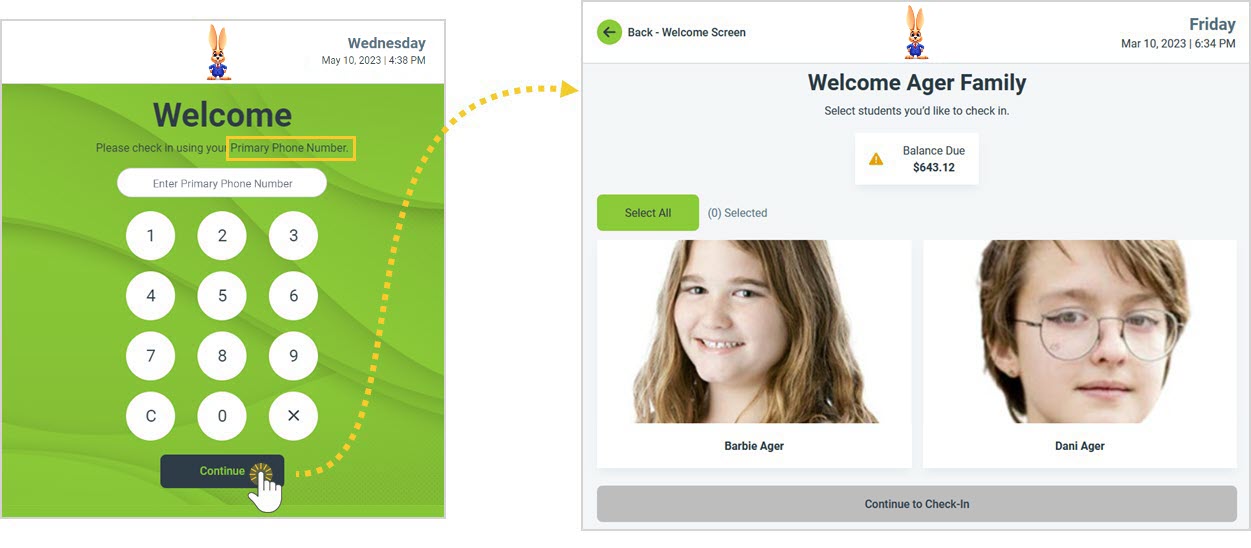
The next screen allows the parent/student to select which classes are being checked into. If you have chosen to use birthday/first day/level-up messages, they will appear here before classes are selected.

| 1 | The Balance Due display is controlled by a Self Check-in setting. |
| 2 | You have three options for class selection: select all classes for all students, select all classes for one student, or select individual classes. |
| 3 | Badges display helpful information. |
| 4 | A Self Check-in setting determines whether a class is available for check-in if the student has a scheduled absence. A badge displays an alert that there is a scheduled absence, and if not permitted to check in, the badge will include instructions to stop by the front desk. |
| 5 | A class passed its start time will display but will not be active for Self Check-in. |
| 6 | When a substitute has been assigned to a class, their name will be displayed to let the student know their regular instructor is away. |
A confirmation screen will display when the parent/student selects the Check In button.

| 1 | The confirmation text is controlled by a Self Check-in Setting. |
| 2 | When I'm Finished is selected, Self Check-in returns to the Welcome page, ready for the next parent or student. |
What Happens Next?
Here's where all the magic happens🪄!
When a student's check-in is complete:
- The student is marked as present. Attendance is recorded in the Class record in real-time and immediately reflected in the Staff and Parent Portals.
- Classes that have been checked into will no longer appear on the Self Check-in screen. This also applies to any students who are already marked present in Jackrabbit or the Staff Portal. If that was the only class for the student that day, a message on the Welcome page will advise that the student has already been checked in.
- Student sign-in has been expedited, and your office staff has been freed up to do what they do best - be there for whatever families need!
Introduce Self Check-in to Your Families
We have created a short video tutorial and an email template to help you announce the Self Check-in feature to your families.
 |
|
 Watch the video
The email template can be found under Families > Email Families or Families > All Families > Send Message > Email. It includes a link to the video tutorial.

Replace your information in the highlighted areas, and you are good to go!
After you have notified families of the new Self Check-in, review the All Families > Primary Phone column to identify families missing their Primary Phone number (Family record > Summary tab). Message these families directly from the All Families page.
Tracking and Reporting for Self Check-in
Organizations that track Absences
Whenever an absence is created with Self Check-in, it is stamped with the UserID “Self Check-in” in the Absences tab of the Student record, the Class Absence History, and the Absences-Makeups report. The Student Attendance report properly reflects attendance/absences.
Organizations that track Attendance
When attendance is recorded with Self Check-in, it is stamped with the UserID “Self Check-in” and properly documented in the Attendance report, the Attendance tab of the Class record and the Student record, and the Student Attendance report.
 Click here to learn more about Reporting on Your Student's Attendance
User Activity Report
All activity with Self Check-in is recorded and accessible using the User Activity report. Active links in the report for the Student and Class columns provide additional details.
Frequently Asked Questions
Q. Does every staff member need a PIN?
A. No. It’s only necessary that staff members who will authenticate and open Self Check-in have a PIN.
Q. What’s the benefit of having a unique PIN for staff members who will open Self Check-in?
A. While it isn’t a requirement, having a unique PIN makes it easy to track who authenticated the Self Check-in in your organization’s activity.
Q. Can I just have one PIN that we all share to open Self Check-in?
A. Yes. If you prefer to only have one ‘global’ PIN to open Self Check-in, consider having one staff member create the PIN and share it.
Another option is to create a staff member specifically for the PIN. First Name: SelfCheckIn / Last Name: PIN. Make sure the Self Check-in PIN staff member has an email address you have access to so you can set up the PIN via email. Once you’ve created the 6-digit PIN, you can give it to any staff member who will open your Self Check-in.
Q. Can I have more than one Self Check-in open for use at the same time?
A. More than one Self Check-in can be open and in use at the same time, so if you have 3 tablets in your lobby, they can all be used simultaneously for check-in.
Q. Can a parent or student change their class check-in status once they’ve checked in?
A. Once a parent/student has marked themselves as checked in (present) for a class, they can’t change the student’s status in that class to absent. In this instance, a Jackrabbit User (within Jackrabbit) or a staff member (via the Staff Portal) would need to make the change for the parent/student.
Q. If someone doesn’t check in using the Self Check-in are they considered absent?
A. This is based on your Self Check-in Settings. If Automatically Mark Students Absent is chosen and families use Self Check-in, the absence of a ‘check-in’ assumes the student is absent. This can be changed using the Staff Portal or by a Jackrabbit User.
If Do NOT Mark Students Absent is selected, and a student does not check in using the Self Check-in, attendance for the class is considered incomplete until an absence is entered manually.