You can add a class from the Classes (menu) > Add Class. The Add Class pop-up modal (window) allows you to enter the majority of the class information that is found on the Class record > Summary tab (excluding gender and age settings). You can choose to enter as much of this information initially as you wish but at a minimum, you must enter the required fields (marked with '*').
- Go to the Classes (menu) > Add Class to open the Add Class window.
- Enter a Class Name.
- Select the appropriate drop-down if you have more than one Location.
- Optionally, select a Room and Instructor for the class.
- You may opt to assign an Instructor and Session.
- Enter a Class Start Date.
- If you designated a Start Date, End Date, and Registration Date for the Session when you were customizing your drop-down lists (Gear icon > Settings > General > Drop-down Lists) these fields will automatically populate. Edit as needed.
- Check the box for the day(s) the class meets. Note: Days the Class meets should be checked in order for Classes to display on Calendars and Schedules.
- Enter the class Start Time and End Time. The Duration will automatically calculate based on those times but can be edited if needed.
- Add the Tuition Fee, Max Size, and Tuition Billing Method at this time or you can add them later.
- Select Category 1 and optionally choose Category 2 or Category 3. To learn more about Category 1 check out our Customize Drop-down Lists section.
- Select the Policy Group(s) for the class when applicable.
- Enter the class Description now or leave it for later.
- Set your preferences for Display on Website, Allow Online Registration, Allow Portal Enrollment, and Allow Trial Enrollment. See Class Summary Tab - The Fields Explained for more information about these fields.
- Click Save, Save & Add Another, or Save & Copy Class. Once a class is created, the new Class record opens to the Summary tab.
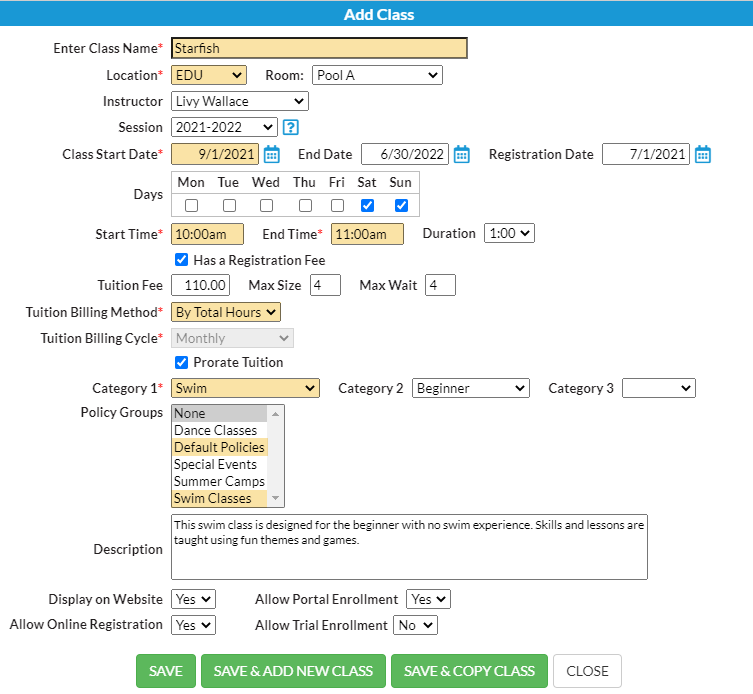

Click the Save & Copy Class button to copy a class with similar details. Change the name when prompted and make changes to details as needed.
