Once you have completed the first step in adding an event, adding an Event Type, you'll need to add specific dates & times when the event will occur.
The Event Dates & Times are added to the Event Type. Some events may take place only once, or they may be offered on several dates. Families or students are enrolled in a specific Event Date & Time.
Create an Event Type and send a private direct link to specific people to invite them to enroll in specific dates/times. Learn how to Create an Invitation Only Event Date.
Add Event Dates & Times
Event Dates & Times are added in the Event Type record. From the Activites menu > Events, select List Event Types to locate the event you want to work with.
- In the Event Type record, click the Add Event (Date & Time) button.
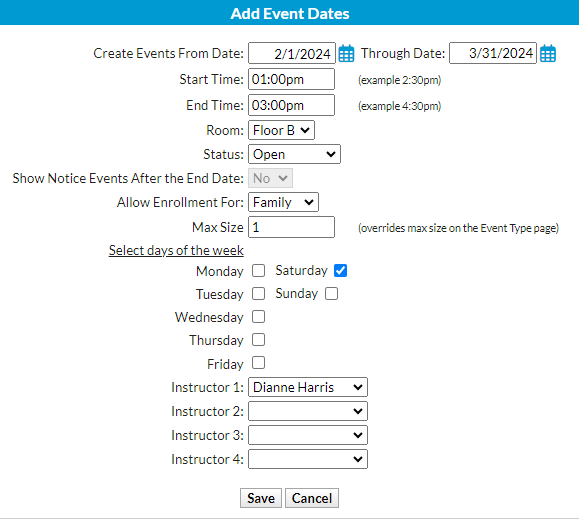
- Enter a date or date range in the Add Event Dates window.
- To add multiple event dates, enter a range of dates in the Create Events From Date and Through Date.
The screenshot below shows the date range for February through March. This will add nine individual event dates, one on each Saturday in those two months.
- To add multiple event dates, enter a range of dates in the Create Events From Date and Through Date.
- Add a Start Time and an End Time, and add a Room if applicable.
- Set the Status to Open, Notice, or Unavailable to ensure the event is displayed on your Event Calendar (unless you have chosen to also display Booked Events).
- If you set Status to Notice, you can change Show Notice Events After the End Date to Yes to have the Notice remain on your Event Calendar after the date has passed. The default is No, and the Notice will drop off the Event Calendar after the event date.
- Allow Enrollment For and Max Size default to whatever you entered when you created the Event Type (on the Event Type record > Summary tab), but you can change these selections for just this specific date if needed.
- Select the days of the week the event will occur.
- Add an Instructor if applicable and Save.

View Event Dates
Once added, you can view Event Dates on the Dates & Times tab of the Event Type record.


- Use the Summary tab fields in the Event Date/Time record to customize an Event Date.
- View the details of the event registrants from the Enrollment tab.
- Access the answers to the questions asked for the Event Type on the Questions/Options tab. From there, you can print the answers or export them (Excel, .csv, or PDF).
- Use the Enroll Existing Family, Enroll Existing Student, or Quick Registration buttons to enroll in this Event Date. Learn more about how to register/enroll in an event.
- Click the Email/Text Event button to send an email to the Event enrollees (the Email Event User Permission is required to send an email to parents and students associated with the event).
- If you are set up for texting in Jackrabbit, you'll have the option to send a text message.
- If you have the Jackrabbit Plus mobile app, you'll be able to send a push notification.
- Jackrabbit's email editor will open. Enter a subject and your message and choose who to send the message to (choose from a combination of Contacts, Students, and/or Staff).
- Use the Post Event Fees button to post fees to each family or student enrolled in the event. Note: Do not use this option if you allow online registration into the event and you've set the Post Event Fee Per field on the Event Type > Summary tab to Student or Family, as this will cause duplicate fee postings. Learn more about posting event fees.