Want to save time by importing your existing inventory into Jackrabbit? Go to the Gear icon > Set Up > Import Data to get started. Once you’ve completed the import spreadsheet, you can upload it yourself from the same Import Data page or email imports@jackrabbittech.com, and our team will handle it for you.
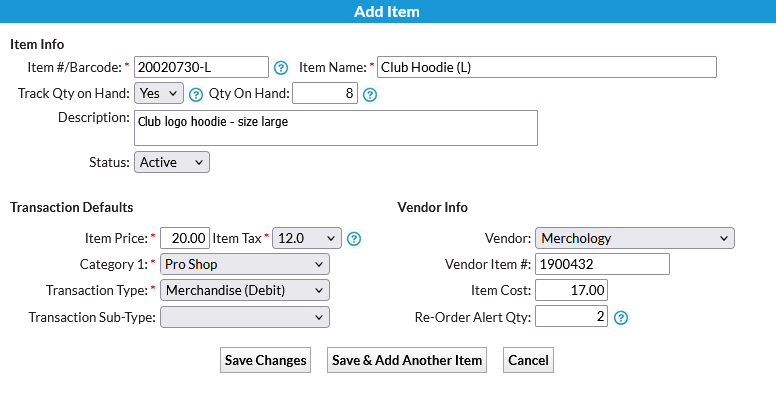
Add Items to the Store
- Go to the Store menu > Add Item.
- Complete the following required fields, marked with a red asterisk. Descriptions for all fields are provided below.
- Item #/Barcode
- Item Name
- Item Price
- Item Tax
- Category 1
- Transaction Type
- Enter details in the optional fields to better track inventory and manage vendor information.
- Click Save Changes or Save & Add Another Item to continue.

| Field Name | Description |
| Item #/Barcode |
The Item #/Barcode can be numbers, letters, or a combination of both (15 characters max.). An item can be entered manually or with a Barcode Scanner. If using a Barcode Scanner, put the cursor in the Item #/Barcode box and scan the item's barcode. |
| Item Name |
The Item Name is an important identifier. It appears in the Select Store Items section of the Make Sale/Post Fees page and helps to ensure the correct item is selected for the sale. |
| Track Qty (Quantity) on Hand |
The Track Qty on Hand field allows for inventory management for an item. When set to No, the Qty on Hand and Re-Order Alert Qty fields are hidden, and the item will not appear on the Items at or below Re-Order Qty Executive Dashboard Alert or on the Re-Order Alert Quantity Report. |
| Qty on Hand |
The Qty on Hand will automatically decrease as items are sold and increase when an item is returned to inventory. To update inventory for purchases, go to the Store menu > Items, click the pencil icon to edit an item, and adjust the Qty on Hand as needed. |
| Description |
Enter a description for the item to help you quickly identify products, differentiate similar items (e.g., Sweatshirt—Child vs. Sweatshirt—Adult), and provide clarity for staff managing inventory. |
| Status |
A Store Item can be Active or Inactive. Change the Status of items you are no longer selling to Inactive. This will exclude them from the Search/Select Item screen when making a sale and from the Executive Dashboard Alert Items at or below Re-Order Qty. |
| Item Price |
The Item Price is the amount your customers will pay for this item (without tax). |
| Item Tax Rate |
Select the appropriate tax rate from the drop-down list. The drop-down values in the list can be edited if needed from the Gear icon > Settings > General > Drop-down Lists > Item Tax Rates. Note: Contact Support to Submit a Ticket or Live Chat if you need to change tax rates for multiple items. We can save you a ton of time! |
| Category 1, Transaction Type, Transaction SubType | Select as applicable. To edit your drop-down lists, go to the Gear icon > Settings > General > Drop-down Lists (left menu). |
| Vendor
Vendor Item # |
The Vendor Item # is typically the number or code used by the vendor to identify the item and is useful when placing orders. |
| Item Cost |
The Item Cost represents the amount you paid for the item. |
| Re-Order Alert Qty |
The Re-Order Alert Qty field is used for inventory management. When the quantity on hand reaches this number, you'll be alerted on the Executive Dashboard that it’s time to order more of the item. For example, if you want to order more hoodies when there are 2 left (quantity on hand), the re-order alert quantity would be 2. |
Frequently Asked Questions
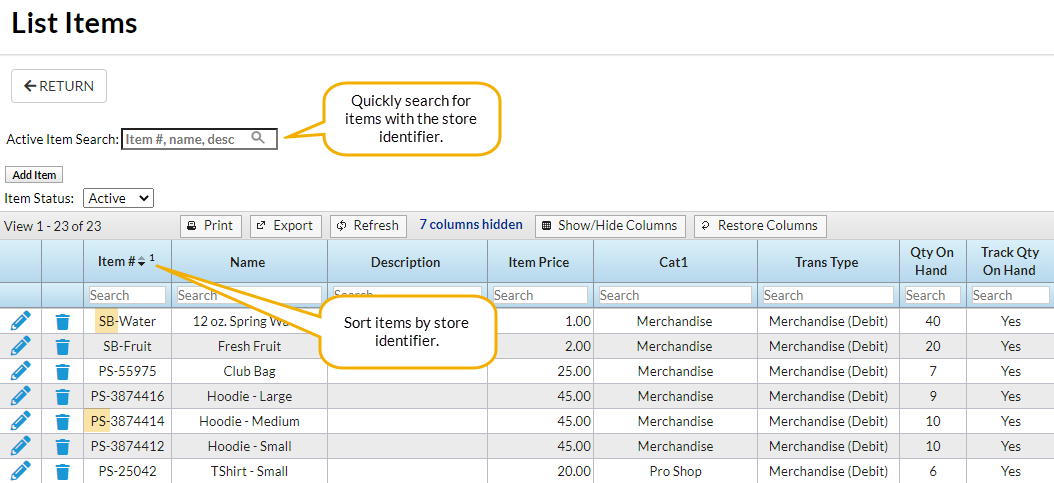
Q. Can I assign items to a specific store account? I want to sell food through my snack bar (SB), not my pro shop (PS) account.
A. All store items are available for sale in all store accounts in your system. There is currently no way to restrict the sale of an item to only a specific store account nor is there a way to track inventory separately between store accounts.
If you wish to track your inventory separately you are advised to add a store identifier to the beginning of all of your items. This will allow you to differentiate between the different store items and will make reporting easier with the ability to sort by the identifier.
Q. Why can I sell an item even if the Qty on Hand is 0 or a negative number?
A. Jackrabbit assumes that the person is standing in front of you with the item in hand. Therefore, Jackrabbit allows you to make the sale regardless of the Qty On Hand value.
Q. How do I increase the amount of stock I have of an item, i.e., the quantity on hand?
A. To increase the Qty on Hand for an item, head over to the Store menu > Items to open the List Items page. Use the pencil icon next to the item to open the edit window and enter the new quantity on hand for the item.