Jackrabbit integrates with QuickBooks Desktop allowing you to save time by exporting your data from Jackrabbit into your QuickBooks company account.
Expand to learn about each step of the export/import process.
Step 1 - Assign QuickBooks Accounts
Before using QuickBooks and Jackrabbit together it is necessary to do a one-time setup to associate every Jackrabbit Category 1 to one of your QuickBooks Income (revenue) accounts.
- Go to the Transactions (menu) > QuickBooks Export.
- Click Assign/Edit QuickBooks Accounts in the left menu.
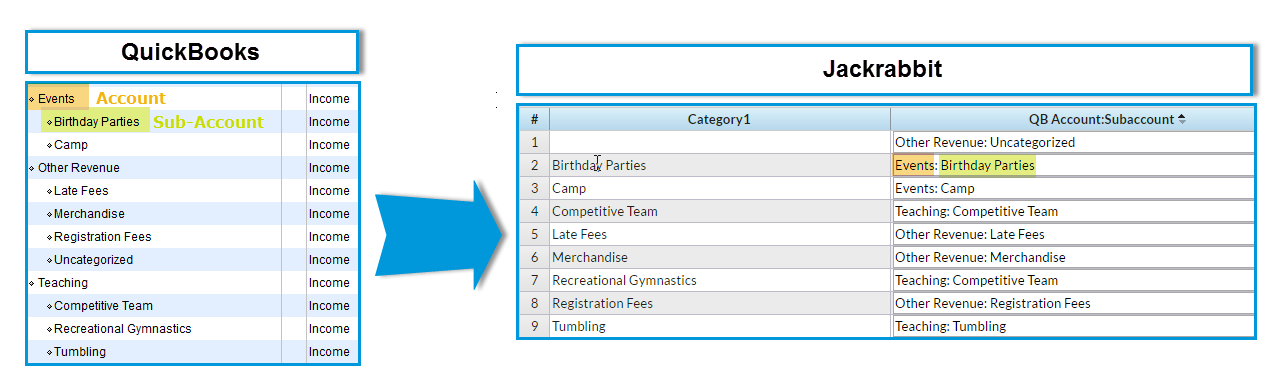
- The first line in the Jackrabbit Category 1 column will be blank. This is intentional and allows for a 'catch-all' for any uncategorized revenue. Assign this a QuickBooks Account that will draw your attention to its need to be allocated to a revenue source.
- Assign each Category 1 value the corresponding QuickBooks Account and Sub-Account (if applicable) separated by a colon. The names must be identical, a copy/paste is recommended to ensure 100% accuracy.
The name entered into the Jackrabbit QuickBooks Account:Subaccount must match the QuickBooks Account and Subaccount EXACTLY. The names are case-sensitive. If the name does not match a QuickBooks Account exactly, a new account will be created in QuickBooks upon import of the IIF file. If you have any Invalid Accounts, remove any special characters, for example, change the "&" to "and."
Step 2 - Download the IIF file in Jackrabbit
The IIF file contains one journal entry for each day in the Date Paid From and Date Paid Through as defined when generating the file. The debits in the entry are a summary of the monies you have taken in and the credits are the revenue accounts associated with those payments. Note: Family/Account names and individual transactions are not exported, this detail is kept in Jackrabbit.
- Go to the Transactions (menu) > QuickBooks Export > QuickBooks Desktop Export (left menu).
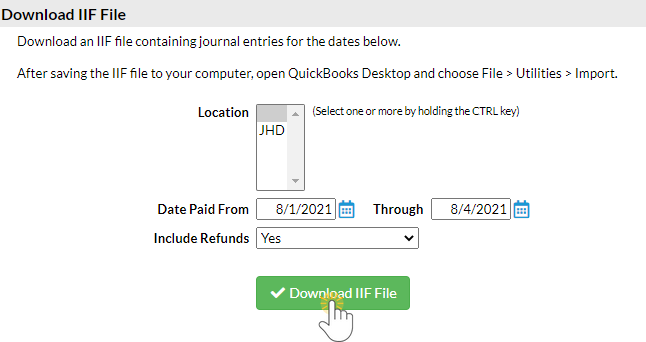
- Select the desired Location(s) or leave blank to include all.
- Enter the range of dates to export in the Date Paid From and Date Paid Through fields.
- Include Refunds defaults to Yes. Change this to No if you do not want refunds included.
- Click Download IIF File. Note: This button will be grayed out if you have not given every Category 1 a corresponding QuickBooks account. Click the link in the warning to Assign/Edit QuickBooks Accounts.

Click Revenue Snapshot from the left menu to generate a report showing the daily summary of revenue by payment method and Category 1.

Step 3 - Import the IIF File into QuickBooks
Once you have saved the IIF file download to your computer you can import it into your QuickBooks company file.
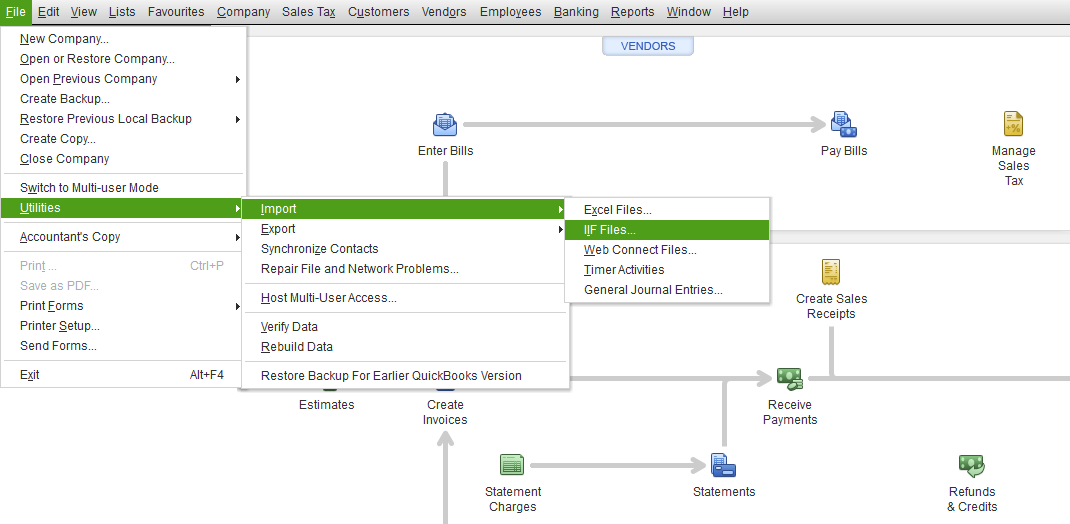
- From the QuickBooks File menu select Utilities.
- Select Import in the pop-out menu.
- Select IIF Files in the next pop-out menu.
- Locate the IIF file on your computer and click Open.
- Click OK to confirm that your data was imported.

The journal entries that are imported into QuickBooks will tie back to/agree with the Revenue Snapshot.
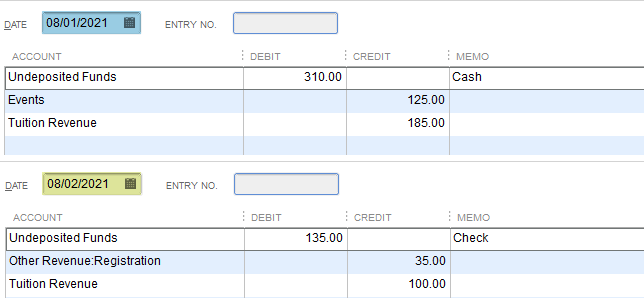
The money that you received from your families is imported into a QuickBooks account called Undeposited Funds. This is done so that you can direct those monies into the appropriate bank account(s) in your Chart of Accounts with the QuickBooks Deposit function. Learn more about Undeposited Funds & QuickBooks Deposits.